Introduction #
In this doc you will learn how to add or remove additional users on the Game Panel or cPanel, and how to set the correct permissions.
Game Panel #
Adding a new user #
To give others access to your game/app server without sharing the same account, follow these steps to add them to your server’s dashboard:
- On your Game Panel, open server’s dashboard of which you would like to add a secondary user.
- Open the ‘Users’ tab.

- Click on the ‘New User’ button.

- A popup will appear. Fill in the email address of the user you would like to add to your (game) server. Note: make sure you have permission from that person to add them as a secondary user to avoid spam.
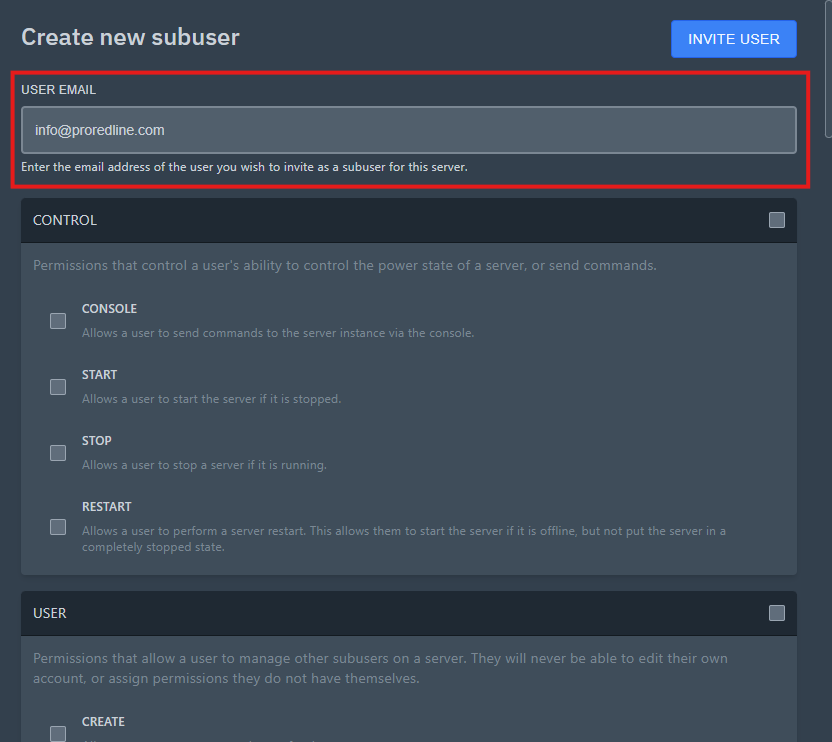
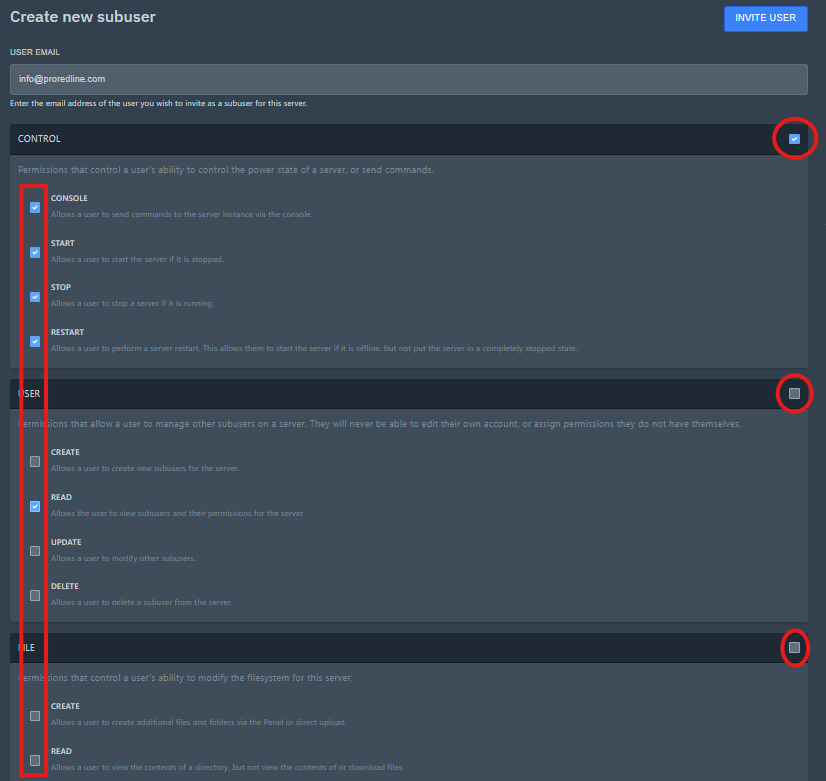
- Select all the permissions you would like the user to have for that specific (game) server. You can select the checkbox in the top right corner of each box to select all permissions within that box. Read more about permissions below.
- Once everything has been filled in and checked (or unchecked), click on the ‘INVITE USER’ button. The user will receive an email notifying them, they’ve been added to your (game) server as a secondary user.
Removing a user #
To remove a user from a specific game/app server, follow these steps:
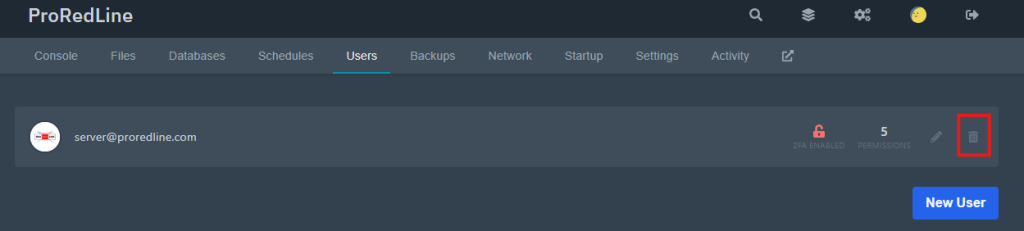
- Go to the ‘Users’ tab on your (game) server’s dashboard.
- On the right of the user’s email, you’ll see a bin icon. Click on this button to delete a user from your (game) server’s dashboard and deleting all of their permissions in the process.
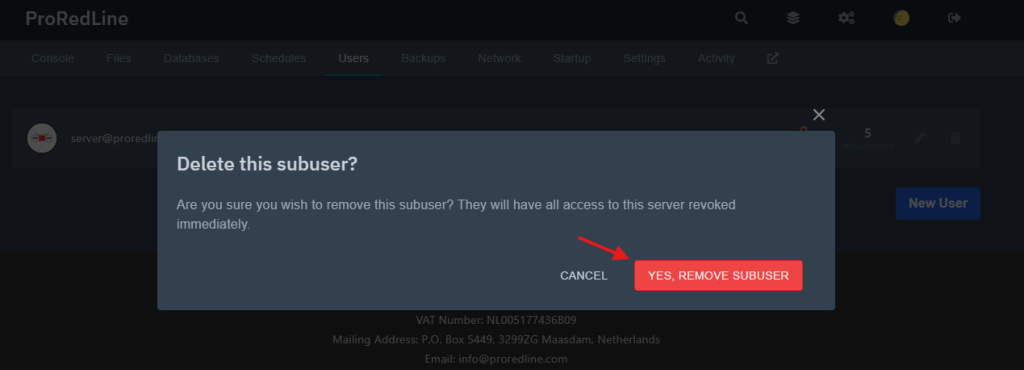
- A popup will appear. This is to confirm the deletion of the user and revoking all access to the selected (game) server. To confirm, click on the ‘YES, REMOVE SUBUSER’ button.
- After confirming, the user will disappear from the ‘Users’ tab and the user will be notified via email of the revoked access to the (game) server.
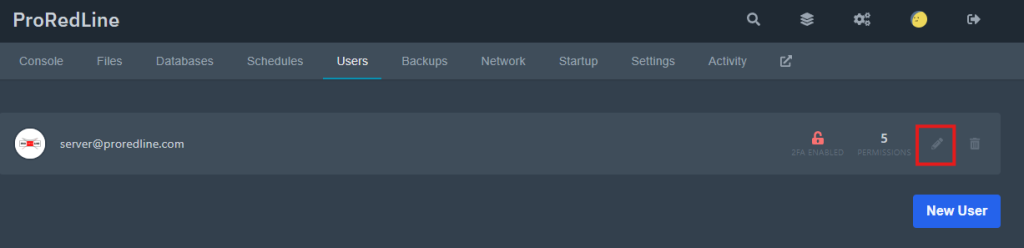
Editing an existing user’s permissions #
- Go to the ‘Users’ tab of your server’s dashboard. The first thing you will see is a list of all the users with access to your (game) server’s dashboard and how many permissions they have. You’ll also be able to see if they have 2FA activated for their account. This can be helpful if you want all users with access to your (game) server, to have a 2FA-enabled account for security reasons.
- To see and edit a user’s permissions, click on the pencil icon on the right of the user’s email address.
- A popup will show. Check or uncheck the permissions you would like the user to (not) have and save the changes by clicking on the ‘SAVE’ button.

Permissions explained #
This is a list of all the permissions for users on the Game Panel:
- Control (‘Console’ tab)
- Console: Allows a user to send commands to the server through the console on the ‘Console’ tab
- Start: Allows a user to start the server
- Stop: Allows a user to stop the server if it’s running
- Restart: Allows a user to restart the server. This also allows the user to start the server when it’s offline, but not put the server in a fully stopped state.
- User (‘Users’ tab)
- Create: Allows the user to add other subusers to the server
- Read: Allows the user to view subusers and their permissions for the server
- Update: Allows the user to modify the permissions of other subusers
- Delete: Allows the user to delete other subusers from the server
- File (‘Files’ tab)
- Create: Allows the user to create additional files and folders via the ‘Files’ tab
- Read: Allows the user to view the content of a directory, but not read or download any files
- Read-content: Allows the user to view the content of all files. This will also allow the user to download files.
- Update: Allows the user to modify files and content of directories
- Delete: Allows the user to delete files and directories
- Archive: Allows the user to archive the contents of a directory to a .ZIP file. This also allows the user to decompress existing .ZIP files on the system.
- SFTP: Allows the user to connect to SFTP (currently not yet supported by ProRedLine).
- Backup (‘Backups’ tab)
- Create: Allows the user to create new backups of the server
- Read: Allows the user to view all existing backups for the server
- Delete: Allows the user to permanently delete existing backups from the system
- Download: Allows the user to download backups of the server to their device. WARNING: This allows the user to access all files of the server within the downloaded backup
- Restore: Allows the user to restore an existing backup to the server. WARNING: This can change or remove files, even if the user does not have any of the permissions under ‘File’
- Allocation (‘Network’ tab)
- Read: Allows the user to view all allocations (IP and Port) of the server. Note: the primary allocation will always be visible, even without this permission
- Create: Allows the user to assign additional allocations to the server (currently not supported)
- Update: Allows the user to change the primary allocation and attach notes to each allocation
- Delete: Allows the user to delete an allocation from the server
- Startup (‘Startup’ tab)
- Read: Allows the user to view the startup variables of the server
- Update: Allows the user to modify the startup variables of the server
- Docker-image: Allows the user to modify the Docker image used when running the server (only supported if the specific server has different Docker images available)
- Database (‘Databases’ tab)
- Create: Allows the user to create a new database for the server
- Read: Allows the user to view the database(s) of the server
- Update: Allows the user to rotate the password on a database. Note: If the user does not have the view_password permission they will not see the updated password.
- Delete: Allows the user to remove database(s) from the server
- View_password: Allows the user to view the password of each database of the server
- Schedule (‘Schedules’ tab)
- Create: Allows the user to create new schedules for the server
- Read: Allows the user to view existing schedules and the task associated with them for the server
- Update: Allows the user to modify schedules and their tasks for the server
- Delete: Allows the user to delete schedules and their tasks for the server
- Settings (‘Settings’ tab)
- Rename: Allows the user to rename the server and change the description of it (this only changes the server’s name and description within the ProRedLine customer dashboard, not within the server itself).
- Reinstall: Allows the user to reinstall the server on the system. In some cases, this can result in a complete ‘factory reset’ of the server and it’s data.
- Activity (‘Activity’ tab)
- Read: Allows the user to view the activity logs of the server.
cPanel #
Adding a new user #
To give others access to your cPanel environment without sharing the same account, follow these steps:
- On cPanel, scroll down to ‘Preferences’ and click on ‘User Manager’.
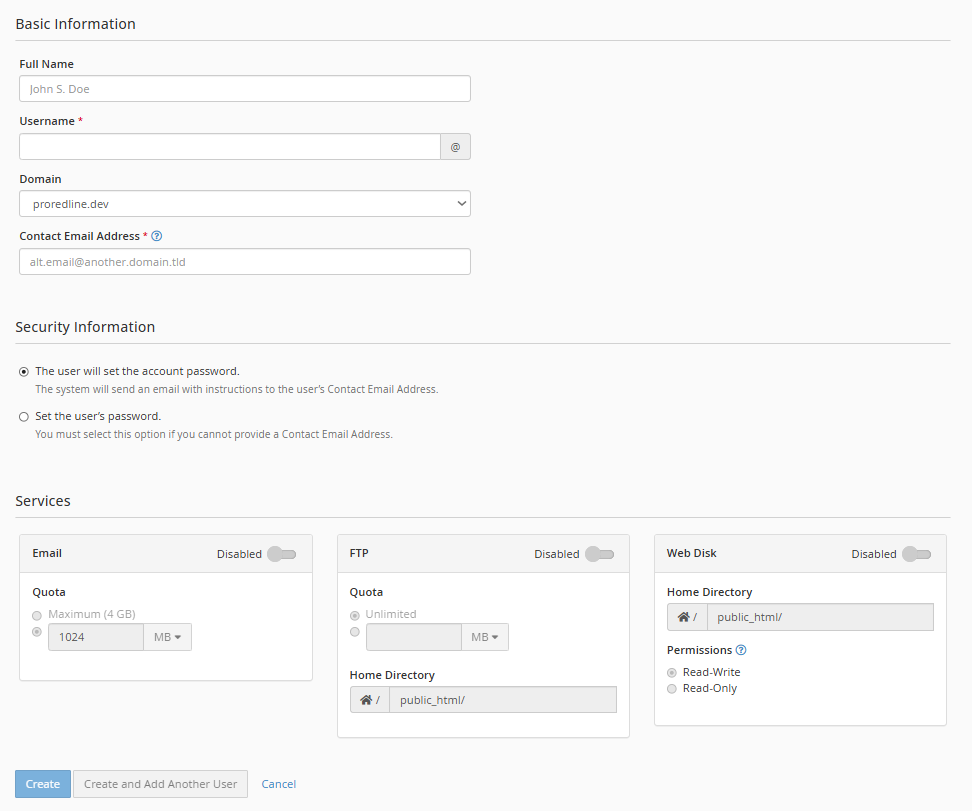
- You will be shown a list with your current users (this includes email accounts), but to add a user, click on ‘Add User’ on the top right.
- Here you’ll be asked for the following information:
- Basic Information:
- Full Name (optional)
- Username (This is the part before @. For example: user@proredline.com)
- Domain (This is the part after @)
- Contact Email Address (An email address where the user already has access to)
- Security Information (choose an option):
- The user will set the account password (Sends the user an email with instructions)
- Set the user’s password (Lets you set the password for the user)
- Services:
- Email (enable first):
- Quota (sets the maximum disk space for their inbox)
- FTP (enable first):
- Quota (sets the maximum disk space for their FTP directory)
- Home Directory (sets the directory from which the user can access. Files and directories above the Home Directory are not shown to the user)
- Web Disk (enable first):
- Home Directory (sets the directory from which the user can access. Files and directories above the Home Directory are not shown to the user)
- Permissions (Read-Write means opening and editing, Read-Only means only opening, but no editing. Deletion falls under editing.)
- Email (enable first):
- Basic Information:
- Once everything has been filled in/selected, you can create the user by clicking ‘Create’ on the bottom of the page.
Removing a user #
Removing users can be done by following these steps:
- On the User Manager page, you will be shown a list of all your current users. Users with a star are administrators (often this includes system accounts). Scroll down (or search) for the user you wish to remove.
- Below the email of the user, click on ‘Delete’.
- A red banner wil show confirming if you wish to delete the account. Click once again on ‘Delete’.
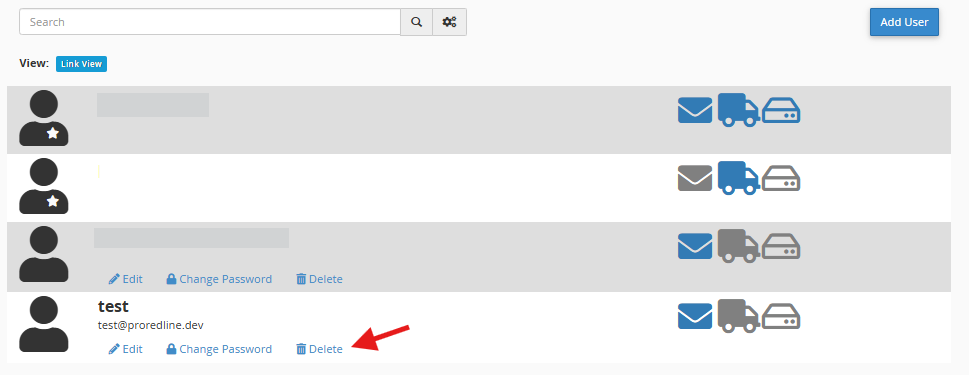
Their account will disappear from the list, which indicated they have been deleted succesfully.
Editing an existing user’s permissions #
Editing users is simular to creating users. Follow these steps to edit user’s permissions in cPanel:
- On the User Manager page, you will be shown a list of all your current users. Users with a star are administrators (often this includes system accounts). Scroll down (or search) for the user you wish to edit.
- Below the email of the user, click on ‘Edit’.
- You will now be shown the same page as when creating a new user. After changing their permissions, click on ‘Save’ at the bottom of the page.
- Back on the User Manager page, you may notice the blue/gray icons. A blue icon means the user has access to that specific service. Grey means that specific service is disabled for that user.
Still need help after reading this article?