Introduction #
In this doc you will find usefull information regarding your Minecraft Java Game Server at ProRedLine. After reading this doc, you’ll know how to configure your server, customize your server, and more.
Startup #
Once the server has been installed, you will need to configure it before it can run as expected.
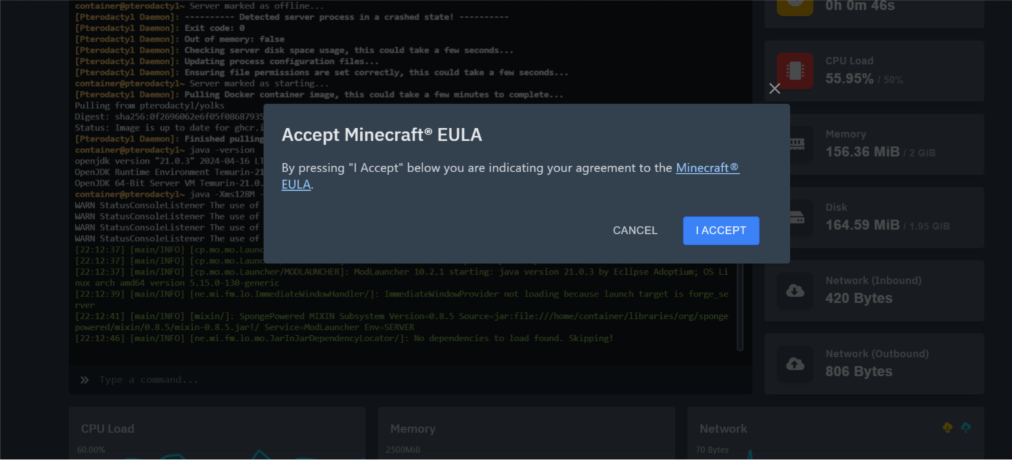
Accept Minecraft’s EULA #
Once your server has been installed, follow these steps to accept Minecraft’s EULA:
- Start Your Server:
Click the blue “Start” button to begin the server startup process. - EULA Popup:
After a few seconds, a popup will appear asking if you accept Minecraft’s EULA. - Accept the EULA:
If you agree to the terms, click the blue “I ACCEPT” button. - Restart the Server:
After accepting the EULA, make sure to restart your server for the changes to take effect.
This will ensure your server is in compliance with Minecraft’s End User License Agreement.
Startup tab #
On your server’s dashboard, go to the “Startup” tab. Here, you will find several settings that you can configure according to your specific needs. Below is a list of options available for your ARK: Survival Ascended server in the “Startup” tab:
- STARTUP COMMAND and DOCKER IMAGE are read-only variables and cannot be modified.
Variables Forge #
- SERVER JAR FILE. This is the name of the JAR file used to run the server. It is not recommended to change this value, but it is possible. Changing this may break your server.
- MINECRAFT VERSION. This specifies the version of Minecraft used on your server. The default is the latest version.
- BUILD TYPE. This determines the type of server jar to download from Forge. Default is “latest,” but you can also choose “Recommended.”
- FORGE VERSION. This specifies the exact version of Forge. It overrides both the MINECRAFT VERSION and BUILD TYPE settings.
Variables Paper #
- MINECRAFT VERSION. This is the version of Minecraft used on your server. Default is the latest version.
- SERVER JAR FILE. This is the name of the JAR file used to run the server. It is not recommended to change this value, but it is possible. Changing this may break your server.
- BUILD NUMBER. This is the version number for the Paper release. Default is the latest version.
Variables Vanilla #
- SERVER JAR FILE. This is the name of the JAR file used to run the server. It is not recommended to change this value, but it is possible. Changing this may break your server.
- SERVER VERSION. This is the version of Minecraft used on your server. Default is the latest version.
Starting your server #
- Once you have configured all the settings, you can start the server by going to the “Console” tab and clicking “Start”.
- Wait a few moments for the server to boot. When you see the message:
“[INFO] Done (<number>s)! For help, type “help” or “?””
or
“Server started.” - Your server is fully booted and ready to be joined.
Changing Configurations #
If you wish to change settings not listed in the Variables section, you can edit the server’s config file located at /home/container/server.properties. However, note that any changes to the Variables options in the “Startup” tab will override the corresponding settings in the config file. We recommend only changing values in the config file that are not listed in the Startup tab.
Updating server #
To update your server’s software, follow these steps:
- Go to the “Settings” Tab: Open your server dashboard and navigate to the Settings tab.
- Scroll Down: Locate the option labeled Reinstall Server.
- Click on “Reinstall Server”: This will start the reinstallation process.
Important note: Reinstalling your server using this method will update the core files only. Your saved data, mods, and custom configurations will generally remain intact. However, we strongly recommend creating a backup of all essential data before proceeding, as some server types may still overwrite or remove custom content.
Clean Reinstallation #
To fully reinstall your server with a clean set of software and files:
- Stop the Server: Ensure your server is not running.
- Delete All Files: Navigate to the Files tab, select all folders and files, and click Delete.
- Reinstall the Server: Once all files are removed, follow the same steps outlined above for updating your server.
Note: This process will permanently remove all files from your server, including custom folders, mods, and configurations. This action is irreversible unless you have created a backup in advance.
Troubleshooting & Support #
If you have any questions or concerns regarding your server at ProRedLine, you can reach our support team by visiting ProRedLine Support.
For questions specifically related to Minecraft, we recommend contacting Minecraft support directly through their Help Center.
Legal Information #
When managing your Minecraft server, it’s important to adhere to the following legal guidelines:
- Minecraft’s Usage Guidelines:
Please review and follow the official Minecraft Usage Guidelines to ensure your server complies with their policies. You can find the guidelines here. - ProRedLine’s Terms of Service (ToS):
Ensure that your server is in compliance with ProRedLine’s Terms of Service. You can read the ToS here. - ProRedLine’s Acceptable Use Policy (AUP):
Your server must adhere to ProRedLine’s Acceptable Use Policy. Please familiarize yourself with the AUP by reading it here.
By following these guidelines, you can ensure that your server operates within the legal boundaries set by both Minecraft and ProRedLine.
Still need help after reading this article?